Monday, May 12th 2026
How to Add a Deceased Loved One to a Photo
Posted by
Some photos feel incomplete. You look at a wedding portrait, a family reunion, a graduation shot—and the first thing you notice isn't who's there, but who's missing.
A few months ago at a friend's gathering, someone mentioned wanting to add her late grandfather into a recent family photo. Another friend wanted to combine photos of her deceased parents with a modern group shot from the holidays. Both had tried other AI tools and got what I can only describe as nightmare fuel—distorted faces, people floating in weird positions, skin tones from a completely different planet.
That conversation is why I built the Add Loved One to Photo tool. I assumed it would take a weekend. I was very wrong. After 200+ failed attempts and months of refining based on real user results, I learned how deceptively hard this problem actually is—and I also learned a lot about what makes a good result versus a bad one.
This post is the guide I wish existed when I started. I'll walk you through exactly how to add a deceased loved one to a photo, but more importantly, I'll share what actually works, what doesn't, and why—so you don't have to waste time on the same trial and error I did.
Before We Start: Why This Is Harder Than It Looks
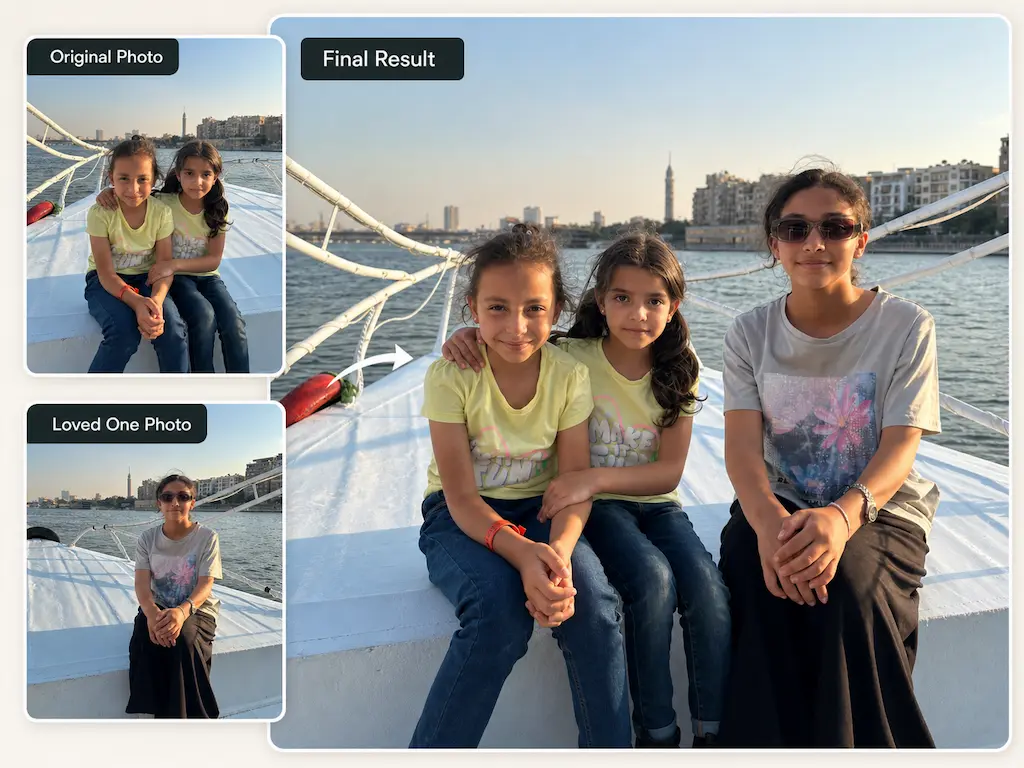
You might think adding someone to a photo is just cutting them out of one picture and pasting them into another. I thought so too. Here's what actually has to happen behind the scenes for the result to look natural:
The two photos you're combining were probably taken years or decades apart, in completely different lighting conditions—one indoors with flash, one outdoors in golden hour. The AI has to reconcile those differences so the person doesn't look pasted in. It needs to get the proportions right when you're merging a headshot into a full-body group shot. It needs to make the person's face actually look like them, not a vaguely similar stranger. And it has to place them in a position that looks natural, not just "somewhere in the frame."
I'm telling you this upfront because it sets the right expectations. The tool handles all of this automatically—you just upload two photos and click a button. But knowing what's happening underneath helps you understand why some photo combinations work better than others, and what to do when the first result isn't perfect.
The Use Cases I See Most Often
I've watched thousands of photos go through this tool. Here's what families actually use it for—and the patterns I've noticed in what produces the best results.
Wedding photos are the #1 use case, by far. Adding a late father or mother to a wedding portrait is the most common request. One user sent me an email saying she'd been searching for years for a way to add her deceased father to her wedding photos. She'd gotten quotes from Etsy editors ($40-60 per photo, 3-day turnaround) and tried two other AI tools that made her dad look like a wax figure. Her words, not mine. When she tried ours, her exact message was "I finally have a wedding photo with my dad." That's the email that made me feel like the 200+ failed iterations were worth it.
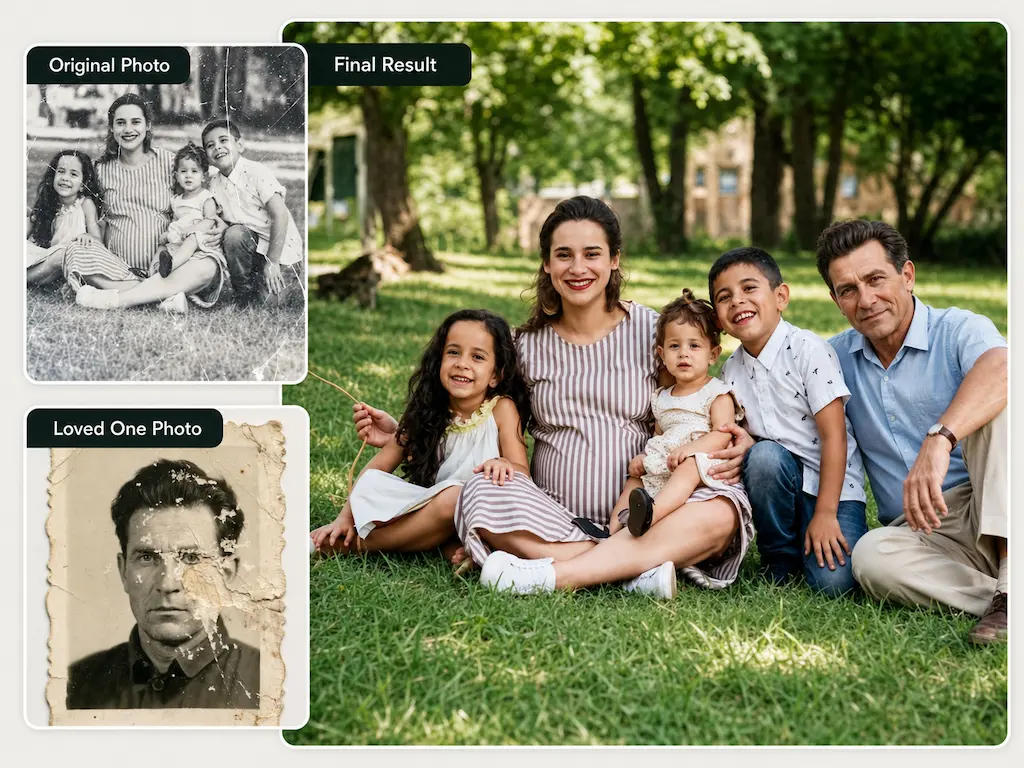
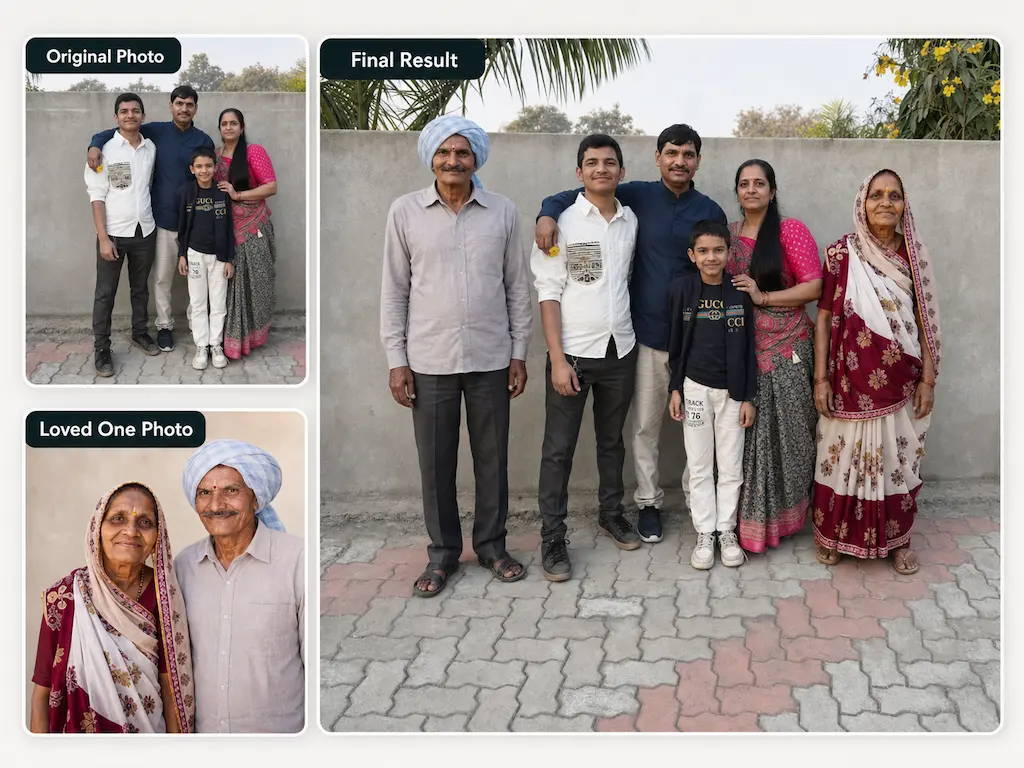
Combining photos of deceased parents or grandparents with modern family photos. This comes up a lot around holidays. A family wants a Christmas card that includes grandparents who passed years ago. Or they want to create a multi-generational portrait that never happened—grandparents appearing alongside grandchildren they never met. The tricky part here is often the source photo: grandma's only available picture is a faded, scratched black-and-white print from 1978. I'll cover how to handle that below.
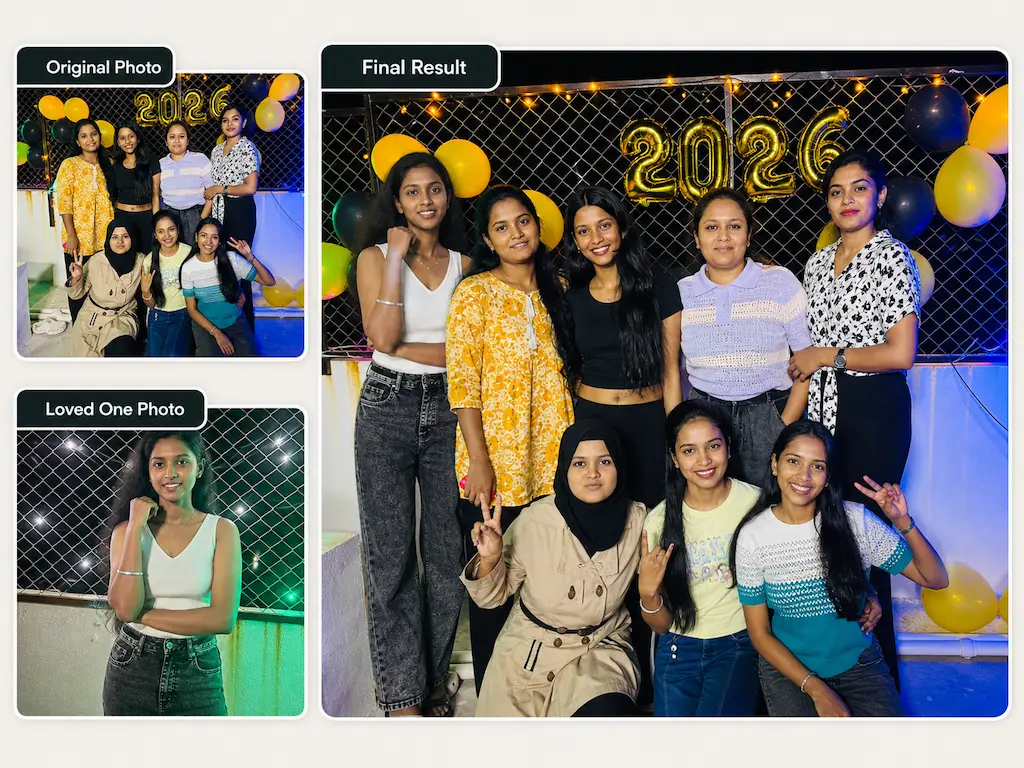
Family reunion group photos with someone missing. Not every absence is a loss. Sometimes a family member lives overseas, was sick, was deployed, or just couldn't make it that day. One user added her sister who was stationed in Germany into the family Thanksgiving photo. Same process, same result—it just happens that this tool works for the living as well as the deceased.
Graduation, birthday, and milestone photos. A parent who didn't live long enough to see the graduation. A grandparent who missed a grandchild's birthday. These photos mark major moments, and families want the people who helped them get there in the picture.
How to Add a Deceased Loved One to a Photo: Step by Step
Here's the exact process. I'm going to walk through it the way I actually use it myself—including the things I do that aren't in any official instructions.
Step 1: Pick the Right Two Photos
This is the step that matters most. The tool can handle a lot—headshots, half-body shots, full-body photos, damaged prints, black-and-white, you name it—but the choice of photos has the biggest impact on the final result.
For the base photo (the group/family photo):
Pick the clearest, best-lit photo you have of the group. Outdoor photos with natural light or well-lit indoor shots work best. If there's some visual "space" in the frame where the person could naturally stand or sit, the AI has an easier job.
One thing I learned the hard way during testing: heavily cluttered backgrounds make life difficult. A family standing in a park? Great. A family crammed into a kitchen with pots and shelves and random objects everywhere? The AI has to figure out what's background and what's person, and sometimes it guesses wrong. Keep it simple when you can.
Photos with 1-4 people produce the most consistent results. Larger groups work—I've seen clean merges with 8+ people—but start with Standard mode to test.
For the loved one's photo:
This is where most people worry, and it's also where the tool surprised me the most during development. It handles a much wider range of input than I originally built for. After launch, users started throwing photos at it that I never tested with—a crispy 2024 iPhone selfie merged with a scratched 1985 Polaroid. Two faded black-and-white photos from completely different decades. A phone snapshot of a framed portrait hanging on a wall. And they worked.
The ideal photo is front-facing, clear, with the face fully visible. But "ideal" isn't required. Old prints are fine. Phone snapshots of printed photos are fine. You don't need a high-resolution scan or the digital original.
The one thing that genuinely doesn't work well: photos where the face is mostly obscured—heavy shadows, extreme angles, sunglasses covering the eyes. The AI needs to see the face to preserve the likeness.
Step 2: Upload Both Photos
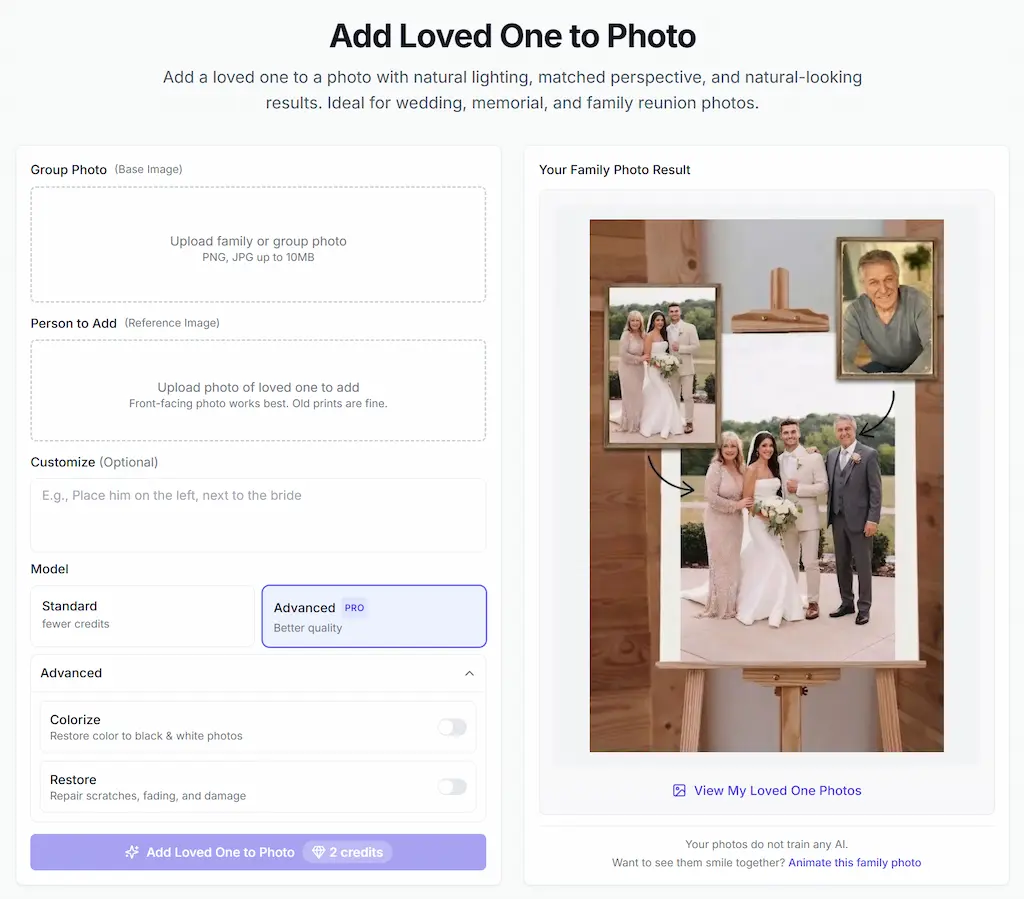
Go to the Add Loved One to Photo page and upload:
- Group Photo (Base Image) — the photo you want the person added into
- Person to Add (Reference Image) — the photo of your loved one
PNG, JPG, and WEBP are all supported, up to 10MB.
Step 3: Tell the AI Where to Put Them (Optional)
There's a Customize field where you can describe the placement. This is optional—the AI makes intelligent decisions about where to position the person—but it's where you can steer the result.
Examples that work well:
- "Place him on the left, next to the bride"
- "Add her sitting on the right side of the couch"
- "Position him standing behind the children"
A tip from building this: describe position, not appearance. "Next to the bride" or "behind the kids" gives the AI useful spatial context. "Make him look happy and wearing a blue suit" doesn't help—the AI already preserves their appearance from the reference photo and handles lighting on its own.
If you're not sure what to write, just leave it blank. For most photos, the AI's automatic placement is surprisingly good. I only use the Customize field when I have a strong preference for left/right positioning or when the base photo has an obvious spot I want the person placed in.
Step 4: Choose Your Settings
Model:
- Standard — fewer credits, faster generation. I use this for every first attempt.
- Advanced — better quality, more natural blending. I switch to this once I know the photo combination works.
This two-step approach saves credits. Don't spend Advanced credits on a test.
Advanced options (expand the toggle):
- Colorize — turns black-and-white photos into color. This is essential when you're combining an old B&W photo of your loved one with a modern color family portrait. Without it, you get a color photo with one person who looks like they time-traveled from the 1940s.
- Restore — repairs scratches, fading, and damage before merging. If your loved one's photo has any visible damage, turn this on. It's the same Old Photo Restoration technology, applied automatically as part of the merge. The difference in output quality is significant—I tested the same damaged photo with and without Restore, and it's night and day.
Step 5: Generate, Look at the Result, and Try Again If Needed
Click "Add Loved One to Photo" and wait. Usually under 60 seconds.
Now here's the thing most tutorials won't tell you: the first result might not be perfect. That's completely normal. I've generated thousands of test images building this thing, and I still typically create 2-3 versions before I'm fully satisfied. The AI produces slightly different results each time—different subtle positioning, slightly different lighting blend—and sometimes the second or third attempt is noticeably better.
If the face doesn't look quite right, try a different reference photo of the same person. If the positioning feels off, add or adjust your Customize prompt. If the overall quality seems low, switch from Standard to Advanced.
The cost of iteration is low (Standard uses fewer credits, and it's fast), so don't treat the first output as the final answer. Treat it as a draft.
Once you're happy, download the image—it's high-resolution, no watermark, ready for printing and framing.
What 200+ Failed Attempts Taught Me (and How It Helps You)
I shared the short version of this on Reddit when I first launched. Here's the longer version, because I think it genuinely helps you get better results.
When I started building this tool, I assumed the hard parts would be the obvious things—cutting someone out of a photo, matching the color temperature. Those turned out to be the easy problems. The actually hard problems were things I didn't even think about until they broke:
The face has to actually look like the person. Sounds obvious, right? But early in development, the merged photos produced faces that were... close. Like, "that could be him if you squint" close. Not "that's clearly dad" close. The difference matters enormously when you're creating a memorial photo. This is why the reference photo quality matters so much—a clear, front-facing shot gives the AI more to work with.
People can't just be placed "somewhere." In early versions, the person would get added to the photo in a technically correct position but with wrong body language. Standing stiffly while everyone else is laughing. Facing slightly the wrong direction. It looked like someone crashed a party they weren't invited to. This is why the Customize prompt helps—"next to the bride" gives the AI social context, not just coordinates.
Lighting from two different decades has to match. A photo from 1990 shot on film indoors has completely different light characteristics than a 2024 phone photo at a park. Early attempts would produce a merged image where four people looked bathed in afternoon sunlight and one person looked like they were standing under a fluorescent office light. You'll get the best results when both source photos have similar-ish lighting. But honestly, even when they don't match at all, the current version handles it far better than I expected.
A headshot merged into a full-body group creates a proportion problem. If your only photo of your loved one is from the shoulders up, the AI has to generate the rest of the body convincingly. Full-body or half-body reference photos produce the most natural results, but headshots work too—we built specifically for this case because that's often all families have.
Real users use real photos—and real photos are messy. After launch, people started combining photos in ways I never tested for. A Polaroid with a coffee stain. A newspaper clipping. A passport photo. Two photos with completely mismatched aspect ratios. Every edge case I fixed made the next user's experience better. This is why I keep saying: enable Restore for damaged photos. It exists because real photos need it.
Specific Scenarios and What Works Best
Adding a Deceased Father or Mother to a Wedding Photo
This is the use case I've spent the most time optimizing for, because it's the one people care about most.
What I've noticed from the best results: use a formal wedding portrait as your base, not a candid mid-dance shot. Outdoor ceremony photos or posed group portraits with good lighting work best. For the loved one's photo, a portrait with similar formality helps—but a casual snapshot still works. The AI is better at adjusting for clothing mismatch than I expected.
If you want to add a deceased father walking the bride, use a base photo where there's space on the bride's side, and write something like "standing next to the bride on her left" in the Customize field.
Combining Photos of Deceased Parents or Grandparents
When families want to create a multi-generational portrait—grandparents alongside grandchildren they never met—the main challenge is usually the source photo quality. Grandpa's only photo might be a faded, creased black-and-white print from decades ago.
Turn on both Colorize and Restore. Colorize converts B&W to color and matches it to the modern base photo. Restore fixes the physical damage first. These two toggles together are what make old-to-modern photo combinations work.
For adding multiple people: add one person per round. Generate the first merge, download it, then use that result as your base photo for the next person. Each round takes under 60 seconds. I've seen families add 3-4 people this way, one at a time, building up to a complete family portrait that spans generations.
Adding Someone Who Couldn't Attend
The process is identical whether the person has passed away or simply couldn't be there. A sister stationed overseas. A friend who was sick. A cousin who missed the flight. Upload the group photo, upload their photo, generate.
Quick Reference: What I Recommend
Best face match → Clearest, most front-facing photo you can find. If you have multiple photos, try a few—different source photos produce noticeably different results.
Most natural lighting → Similar lighting in both photos (indoor-to-indoor, outdoor-to-outdoor) gives the best blend. Mismatches work too, just not as seamlessly.
Old or damaged photos → Enable Restore. Always. For B&W, enable Colorize too.
Adding multiple people → One person per round. Use each output as the base for the next.
First attempt → Standard mode. Final version → Advanced mode.
First result isn't perfect → Normal. Generate 2-3 times. Adjust the Customize prompt or try a different reference photo.
What to Do After
Once you have your merged family portrait:
Animate it. Upload the result to Animate Old Photos and everyone in the photo smiles, blinks, and turns their heads in a short video. There's a direct link under every result: "Want to see them smile together? Animate this family photo." The first time I saw a merged memorial photo start moving—grandmother smiling next to grandchildren she never met—I understood why people find this meaningful. Here's our full guide on how to animate old photos.
Create a hug video. The AI Hug Generator makes a video of two people embracing. For memorial photos, this is the one that hits hardest. See our AI hug video guide.
Fix old photos first. If you have damaged photos you want to use as source material—for merging or for anything else—the Old Photo Restoration tool repairs scratches, fading, and blur.
Closing
I'll be honest: when I started this project, I was thinking about it as a technical problem. Face consistency, lighting algorithms, spatial positioning. After watching real families use it—watching someone see their late father in a wedding photo for the first time, or seeing a grandmother appear alongside grandchildren she never met—I stopped thinking about the tech.
Families have been creating memorial portraits for generations. Painted, composed, retouched by hand. The desire to complete a family photo isn't new. The tools are just faster now.
If you have a photo that feels like it's missing someone, give Add Loved One to Photo a try. Two photos, one button, under 60 seconds. Some photos just need one more person to feel right.
FAQs
How do I add a deceased loved one to a photo?
Upload your family photo and a clear photo of your loved one to Add Loved One to Photo. Click the button. The AI merges them with matched lighting, perspective, and skin tone in under 60 seconds. No editing skills needed.
Can I add a late father or mother to a wedding photo?
Yes—this is the most common use case. Wedding group portraits produce natural-looking results that families frame and display. Works whether the person passed recently or many years ago.
Can I combine photos of deceased parents into one family portrait?
Yes. Add one person per round. Generate the first merge, download it, use it as the base for the next person. Each round is under 60 seconds. Families regularly add 2-4 people this way.
Does this work with old, damaged, or black-and-white photos?
Yes. Enable Restore for damage repair and Colorize for B&W photos. The tool handles old prints, low-resolution scans, and even phone snapshots of framed photos. You don't need a professional scan.
Can I add someone to a large group photo?
Yes. 1-4 people in the base photo gives the most consistent results, but larger groups work too. Add one person at a time for the best output.
Is it respectful to add a deceased loved one to a photo?
Families have been creating memorial portraits for generations—painted, composed, retouched. This is a modern version of the same tradition. Many families use these photos as tributes, keepsakes, and gifts.
What happens to my uploaded photos?
Your photos don't train our AI. They're automatically deleted after 30 days, and you can delete them manually anytime. We don't sell or share them.
How much does it cost?
New users get free generations. After that, credits are one-time purchase—usually under $1 per image, no subscription. See the pricing page.
What if the first result doesn't look right?
Normal. Generate again—results vary each time. Adjust the Customize prompt, try a different reference photo, or switch to Advanced mode. Most people find a keeper within 2-3 tries.
Can I animate the merged photo?
Yes. Upload it to Animate Old Photos for a short video where everyone moves and smiles. Or create an AI hug video from it.